Installation and Troubleshooting
Let’s get you set up
Whether you’ve just received hardware and need to get going, or you’re having issues with your setup, we can help. Let’s start by checking through the following steps.

Installation using an ethernet network cable
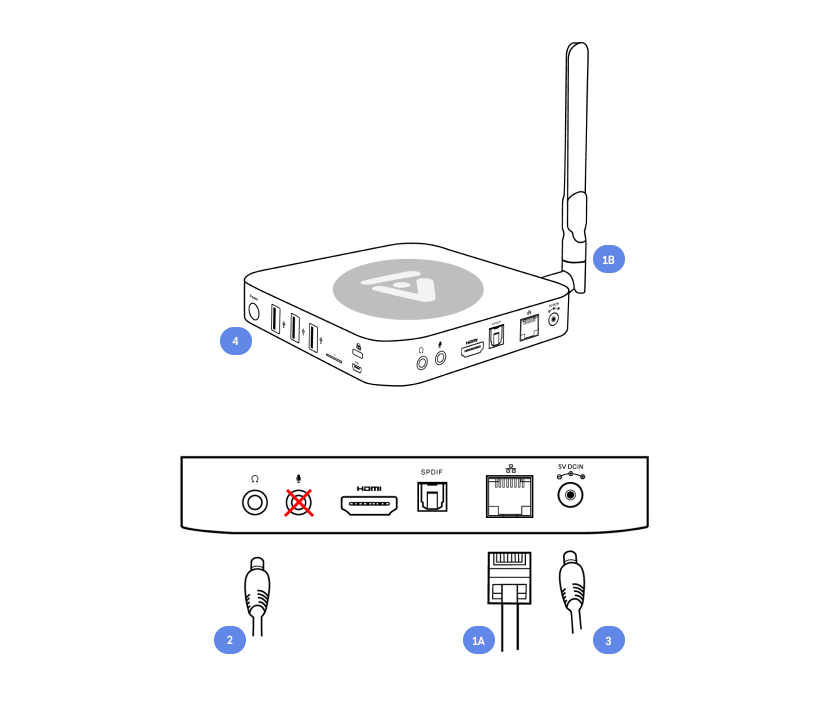
1A. Connect the ethernet network cable to the media player.
2. Connect the audio cable. You may use a 3.5mm audio plug (goes into the headphone jack) or an optical wire (goes into the SPDIF jack) to connect the media player to your audio receiver or amplifier.
3. Connect the power adapter to the back of the player and to a working power outlet.
4. Once the power adapter is connected, the front blue light will turn on automatically. If it does not, press the power button located on the right side of the player and wait up to 2 minutes for the music to start playing.

Installation using WiFi
1B. Attach the external wireless antenna included in the box.
2. Connect the audio cable. You may use a 3.5mm audio plug (goes into the headphone jack) or an optical wire (goes into the SPDIF jack) to connect the media player to your audio receiver or amplifier. Do not connect the audio cable to the microphone jack.
3. Connect the power adapter to the back of the player and to a working power outlet.
4. Once the power adapter is connected, the front blue light will turn on automatically. If it does not, press the power button located on the right side of the player and wait up to 2 minutes for the music to start playing.

Troubleshooting
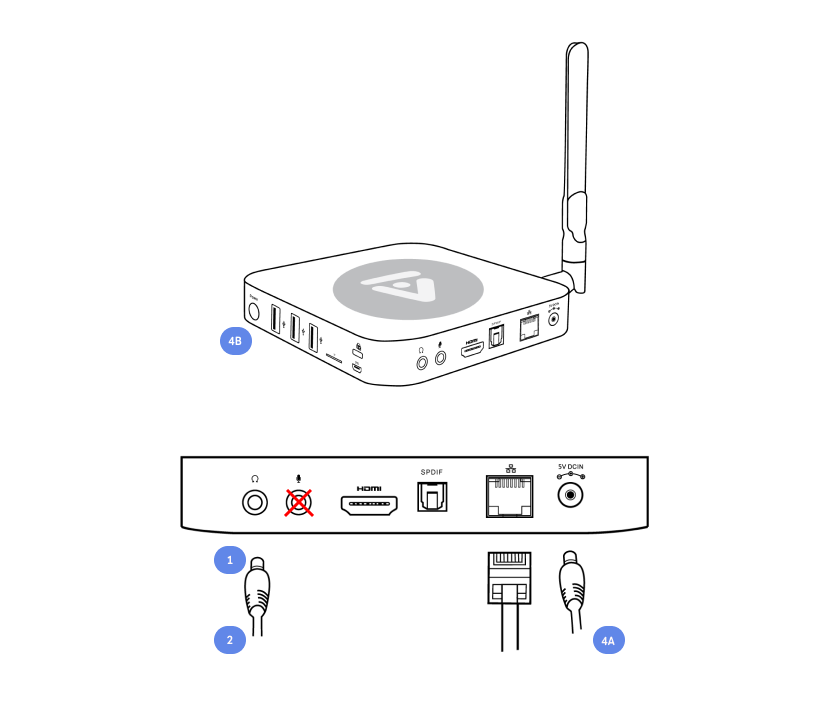
1. Please ensure your audio cord is plugged into the headphone jack and NOT the microphone jack.
2. You can check if music is playing by attaching a pair of headphones to the media player.
3. If you hear music using headphones but do not hear music in your location when connecting the store’s audio cord, contact your A/V team or Activaire support. There may be a disconnected wire or issues with the A/V system, such as the amplifier.
4A. If the player is not outputting music, please restart it by unplugging the power cord.
4B. Wait 30 seconds, then connect the power cord and press the power button. If music does not resume in 2-4 minutes, please contact us.
Specifications
| Processor | Quad-Core Cortex A53 Processor (64-bit) |
| GPU | Penta-Core Mali-450 GPU |
| Memory | 2GB DDR3 |
| Internal Storage | 16GB eMMC 5.0 Storage (MLC) |
| Wireless Connectivity | 802.11ac 2 x 2 MIMO Dual-Band Wi-Fi (2.4GHz/5.0GHz), Bluetooth 4.1 |
| Audio Output | Via HDMI™ 2.0, 3.5mm Stereo jack, Optical SPDIF |
| Peripheral Interface | RJ-45 Gigabit Ethernet – Supports hotspot sharing via Wi-Fi, Micro SD card reader, USB 2.0 port x 3, OTG port x 1, Kensington Lock ready Microphone jack, Headphone jack, IR receiver (remote included) |
| Power | DC 5V, 3A adapter included (CE, FCC certified) |
Basic network requirements
Activaire media players are plug-n-play devices, easy to install and to use.
Every player requires access to the internet and must have a dedicated ethernet cable. WiFi connections are permitted but not recommended.
Our media player requires basic open network access.
All communication to our servers is secure via HTTPS (port 443).
A Static IP address can be assigned to the media player, but we recommend enabling the DHCP server on your router for the player to auto-obtain a local IP address.

Advanced network requirements
| Port | Protocol | Description | Destination IP/Domain |
|---|---|---|---|
| 53 | UDP | DNS (Routing) | Any public DNS |
| 123 | UDP | NTP (Time server sync) | pool.ntp.org * |
| 80 | TCP | Network health detection | verify.activaire.com * |
| 443 | TCP | Updates and Device administration | connect.activaire.com (IP :18.213.77.50) recovery.activaire.com (IP: 18.184.52.237) ds.activaire.com (IP: 18.211.34.40) ds3.activaire.com (IP: 52.1.176.93) auth.activaire.com* artwork.activaire.com* content.activaire.com* |
Additional network settings (if not already enabled):
1. Enabling NAT
2. Disabling Load-balancers (in order to support web-socket connections)
3. Disabling TCP RST
4. Enabling support for TLSv1.2
